
How to Build a Plumbing Website (Step-by-Step Guide for Beginners)
So, you’re a great plumber – but building a plumbing website sounds as intimidating as fixing a burst pipe in a thunderstorm? Don’t worry!

Even solo plumbers with little to no tech experience can create a professional website to showcase their services. In fact, having your own site is crucial: around 81% of shoppers check online before making a purchase decision (and that includes homeowners looking for plumbers!). The good news is, you don’t need to write code or hire an expensive developer. This guide will walk you through how to build a plumbing website from scratch, in plain English, with tips tailored for a one-person plumbing business.
What to expect: We’ll start with the basics (choosing an easy website builder and a domain name) and move on to content, design, and even a pinch of SEO and marketing. By the end, you’ll not only have a functioning website, but one that can actually attract customers. Plus, you’ll discover some tools – like Pineapple Builder, an AI website builder – that can make the process even easier (think “automated website” easy). Let’s dive in!
1. Choose the Right Website Builder (Your “Foundation”)
The first step in building your plumbing website is picking a platform to build it on – essentially, your website “toolkit.” For beginners, a website builder is the way to go. These are services that let you create a site through user-friendly interfaces (usually drag-and-drop or fill-in-the-blank style), so you don’t need any coding knowledge .
Popular Options: Builders like Wix, Squarespace, Weebly, or Pineapple Builder are all geared toward small business owners. They come with ready-made templates (some even have ones specifically designed for trades or home services) and intuitive editors. For example, Wix and GoDaddy offer plumbing website templates you can start with .
Why Pineapple Builder? Pineapple Builder is an AI-powered website builder designed for busy business owners. It can generate a professional site based on a simple description of your business – meaning you describe your plumbing business in a few sentences, and it creates the pages and content automatically. This is like having a virtual web designer on call 24/7, which is perfect if you want the absolute easiest path (it even writes some of the text for you, so you’re not stuck staring at a blank “About Us” page). It’s a newer tool, but a game-changer for non-techies who just want a working site without tinkering .
Things to Consider: Whichever builder you choose, make sure it’s easy to use, within your budget (many have free plans or trials), and offers the features you need. For a plumbing site, crucial features include a contact form, photo galleries (to show your work), and mobile-friendly templates. Most modern builders have these by default – for instance, Tradify’s builder (geared toward trades) emphasizes its plumbing templates and integration with other apps , while Pineapple Builder focuses on simplicity and AI content generation.
👉 Quick Tip: If you’re overwhelmed by options, start with a free trial of a builder (Pineapple Builder offers a free sign-up, as do others like Wix). You can play around without commitment. The key is to pick one and stick with it – the rest of your website-building steps will be much smoother once you have this foundation set.
2. Secure a Domain Name (Your Online Address) 🌐
Next up is claiming your website’s name, known as a domain name. This is the website address (URL) that people will type in to find you – for example, JoesPlumbing.com or FlowProPlumbing.co.uk. A good domain is important for looking professional and being memorable.
Keep it Simple and Relevant: Ideally, use your business name (or a close variant) in the domain. If your plumbing business is called “Smith Plumbing Services,” a domain like SmithPlumbingServices.com or SmithPlumbing.co.uk works well. Shorter is usually better, as long as it’s clear. If your exact business name is taken, consider adding your city or area: e.g. SmithPlumbingDenver.com or SmithPlumbingUK.com. This can also help local customers identify you. For example, if “EmergencyPlumbers.com” is not available, something like EmergencyPlumbersUK.com would do the trick .
Choose the Right Extension: .com is the most common and generally a safe bet. For UK plumbers or country-specific businesses, a local TLD like .co.uk (or .com.au, .ca etc. for other regions) can be good especially for local trust. If possible, grab the .com and local domain. But don’t worry too much – content and service quality matter more than the extension.
Where to Buy: You can purchase a domain through many providers. Big domain registrars include GoDaddy, Namecheap, Google Domains, etc. Often, the website builder you chose in Step 1 will let you purchase a domain directly through their interface (or even give a free domain for the first year). This can be convenient because it gets automatically connected to your site. If you go through a separate registrar, you’ll just need to follow the builder’s instructions to connect the domain to your new site (not hard – usually a few clicks or a support article to guide you).
Cost: Domains typically cost around $10–15 (USD) per year, depending on the extension and provider. It’s a minimal investment for your business’s online identity. If your budget is zero, you can use a free subdomain provided by some builders (like yourname.buildername.com), but this looks less professional and can hurt credibility.
👉 Quick Tip: Brainstorm a few domain name choices in case your first pick is taken. Tools on domain registrars will suggest alternatives. Go for something that’s easy to spell and remember (avoid super long names or hyphens if possible). Once you find one you like that’s available – snag it! It’s no fun to come back later and find someone else grabbed it.
(And yes, do this even if you’re using Pineapple Builder or another AI tool – they’ll have a place for you to claim or connect a domain so your site isn’t stuck on a temporary URL.)


-
3. Pick a Template and Brand It Up 🖌️
Now the fun part begins – designing the look of your site. Don’t worry, you don’t have to design from scratch. Website builders come with templates or themes: pre-designed layouts that give you a professional look from the start. For a plumbing website, you’ll likely find templates under categories like “Service Business,” “Local Business,” or even specifically “Plumber” or “Home Services.”
Choose a Professional Template: Pick a template that fits a plumbing business vibe: clean, easy-to-navigate, and mobile-responsive. Many builders have templates with relevant images (pipes, tools, happy homeowners) already in place – you can swap these out later, but it helps to start with something that feels right. Don’t overthink it. The main goal is a site that looks trustworthy and lets people find info quickly. Templates labeled for small businesses or contractors often have the sections you need. Pineapple Builder’s AI will actually generate a design for you, so if you use that, you might skip template browsing and simply choose a style it presents. Otherwise, spend a few minutes previewing templates and select one you like.
Add Your Logo & Branding: If you have a business logo, great – upload it to the site header. If you don’t have one yet, consider creating a simple logo. You can hire a designer, but there are also easy tools like Canva or Logo.com to make a basic logo on your own . Even plain text with a nice font can suffice as a starter logo. The idea is to have your business name clearly displayed. Choose colors that match your existing branding (if you have company colors/uniforms) or something that conveys trust – blues and greens are common in plumbing sites (water = blue, eco-friendly or pipe copper = green/orange, etc.), but it’s up to you.
Customize Colors and Fonts: Templates come with default colors and fonts, but you can typically change these in the builder settings. It’s usually best to stick to 2-3 main colors. For example, maybe use a blue or green for headers or buttons, and a neutral color for backgrounds. Consistency is key for a polished look. The top plumbing websites keep a clear visual hierarchy: big bold headlines, easy-to-read fonts, and a color scheme that matches their logo or industry . You don’t need to be a design expert – just pick styles that look clean and ensure text is easily readable (no neon yellow text on white, please!).
Layout Basics: Most templates will have a pre-set layout with a navigation menu at the top, a big banner or header image, sections for content, etc. As you customize, think about what you want visitors to see first. Typically: a welcoming image or banner, your tagline or business name, and a clear call-to-action (like “Call for 24/7 Service – 555-1234” or “Schedule an Appointment” button) should be prominent. We’ll delve into specific content in the next step, but as you tweak the template, always preview how it looks on desktop and mobile (good builders let you toggle mobile view – do use that feature). Make sure the layout doesn’t get weird on a phone screen; nowadays, a huge chunk of customers will view your site on mobile – in fact, about 63% of all Google searches are from mobile devices . A responsive template will handle this automatically, but it’s good to check that text isn’t too long in buttons, etc., so it all flows nicely on a small screen.
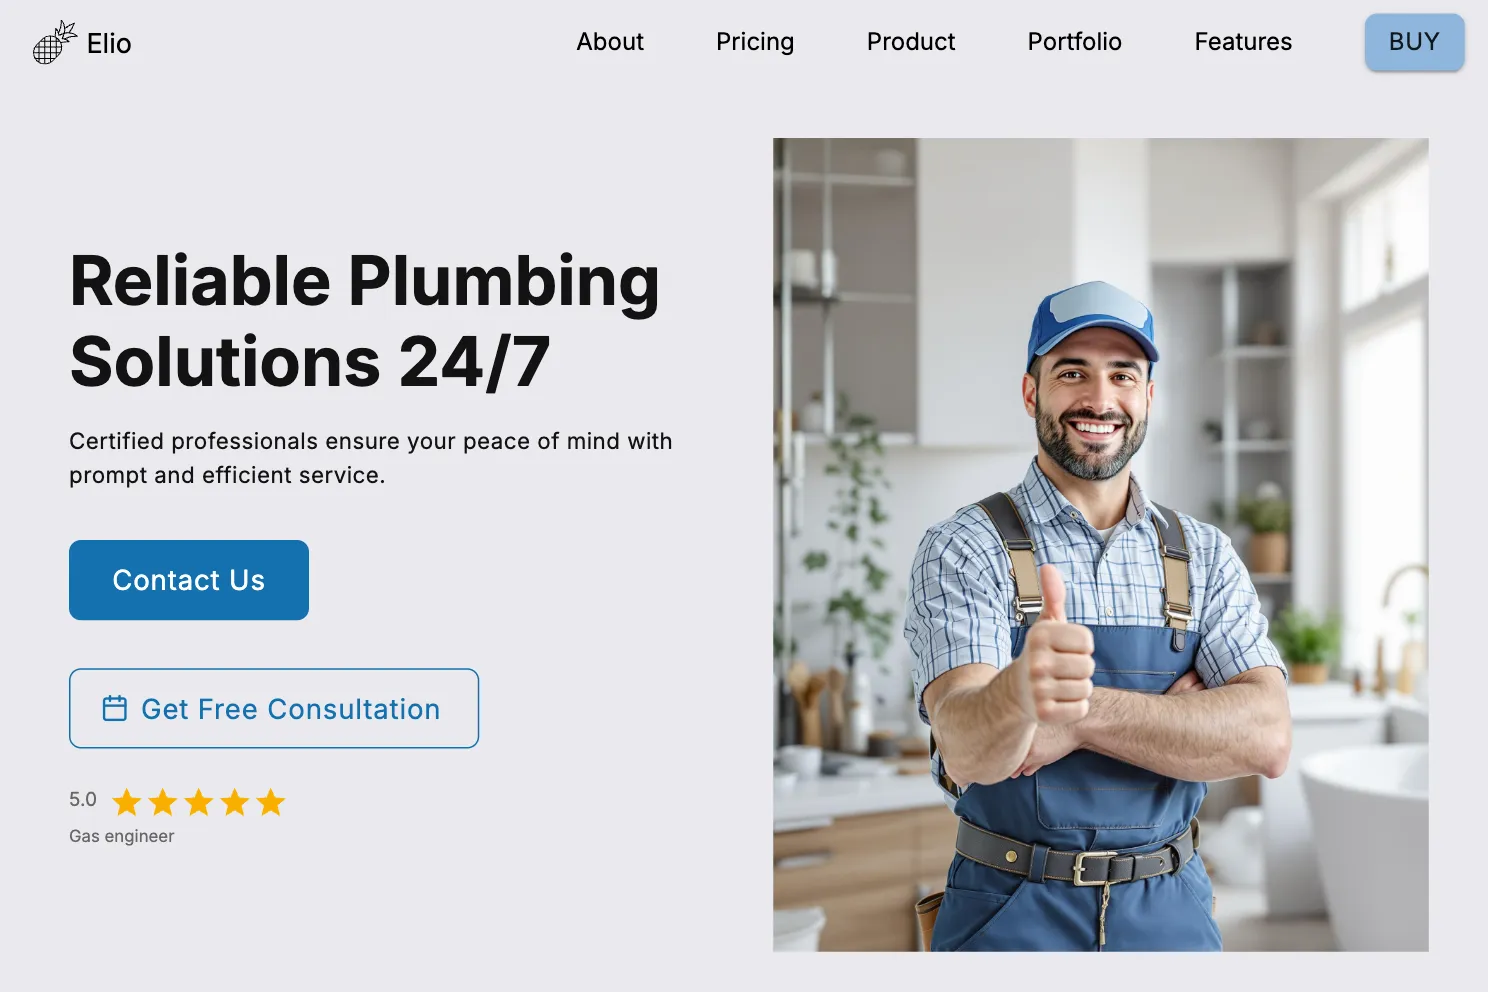
Example: A well-designed plumbing website homepage (Penguin Air & Plumbing). Notice the clean header with the logo and phone number, an inviting image, and a bold call-to-action form (“request appointment”) above the fold. Your template can be customized to achieve a similar, easy-to-navigate look.
👉 Quick Tip: Don’t get stuck in perfectionism here. Your goal is a tidy, professional look that matches your business. It doesn’t have to win design awards – it just needs to NOT scare customers away. Use whitespace (don’t overcrowd text), and break up sections logically (services, about, contact…). If design really isn’t your thing, that’s another reason an AI builder like Pineapple can help – it makes a lot of those design choices for you. But even then, you can tweak colors and images to make it feel like “yours.”
4. Create Essential Pages & Content (What to Include) 📄
With the framework in place, it’s time to fill your website with the information your customers need. A plumber’s website doesn’t need dozens of pages – but it must cover the basics in a clear way. Here are the essential pages/sections you should have, and tips for content on each:

Home Page
This is your landing page and first impression. It should quickly tell a visitor who you are and what you do. Include a headline or tagline – for example, “Reliable Plumbing Services in [Your City]” or “24/7 Emergency Plumber – Fast & Affordable.” In a few sentences (or bullet points), highlight your key services (“Leaks, clogs, water heater repair, and more”) and what makes you stand out (“Licensed plumber with 10+ years experience serving [area]”). Make sure your contact info is immediately visible – many plumbers put a phone number right at the top. You can also have a “Request a Call” or “Schedule Service” button prominently. Essentially, the home page is a summary of your services and a pathway for the customer to take action (contact you). It doesn’t need to be long. Think of the home page as the storefront window. Show the most important info front and center.
Services Page(s)
List out the plumbing services you offer. Many top sites actually have separate pages for each service (e.g., one for Drain Cleaning, one for Water Heater Installation, etc.) which can help your SEO (each page can target those keywords). In the beginning, you could also have one main “Services” page that outlines everything, and later expand into subpages. For each service, write a brief description in layman’s terms. What is it, and why might a client need it? For example, “Leak Repairs: We fix leaky faucets, pipes, and toilets fast – preventing water damage and high water bills.” Keep the language simple and address the customer (“you”). Also, mention if you offer free estimates or any guarantee. Pro tip: Having individual service pages can help you rank when someone searches “YourTown water heater repair,” because you’ll have a page specifically about water heater repair in YourTown . If using Pineapple or another AI, it might generate starter text for these pages that you can then personalize.
About Us Page
People hire plumbers they trust. Use the About page to introduce yourself (and your team, if any). Share a bit about your experience (“Certified plumber with 15 years in the industry, specializing in residential repairs”), your philosophy (“I believe in honest, up-front pricing and doing the job right the first time”), and maybe a personal touch (“When I’m not fixing pipes, you can find me fishing at Lake Sunshine”). A photo of you (and your crew or van) goes a long way to humanize your business. It doesn’t need to be an essay – even a few paragraphs is good. The goal is to build credibility. If you have any trade licenses, certifications, or memberships (like being Gas Safe registered in the UK, etc.), mention them here or display the logos (these are trust signals!). Fun fact: Many top plumber sites showcase team photos or owner’s picture because it builds trust – customers like to see the people behind the business .
Contact Us Page
Absolutely essential. This page should have all the ways to contact you: phone number, email, maybe your business address (especially if you serve a particular region or have an office). Include a simple contact form as well, where visitors can send a message or request a booking by filling out their name, email/phone, and a message. Most site builders have a contact form element you can drop in – just make sure it’s set to send submissions to an email you check. Also, consider embedding a Google Map if you want to show your physical location or service area (builders like Weblium highlight easy Google Maps integration for this ). Tip: On the contact page (and really, in your footer site-wide), restate your service area – e.g. “Based in [Town], serving all of [Region] including [Nearby towns].” This helps local SEO and manages expectations of how far you’ll travel.
Pages for Specific Locations (Optional)
If you serve multiple distinct towns or areas, you can eventually create separate pages like “Plumber in {TownName}” for each, with content tailored to that location. This is a more advanced SEO strategy for local ranking – not critical on day one, but something to note for future. Trades Get Online’s guide suggests location-specific pages to boost local search visibility . If you’re just focused on one city, your home page can do that heavy lifting by mentioning your city frequently in the text (naturally).
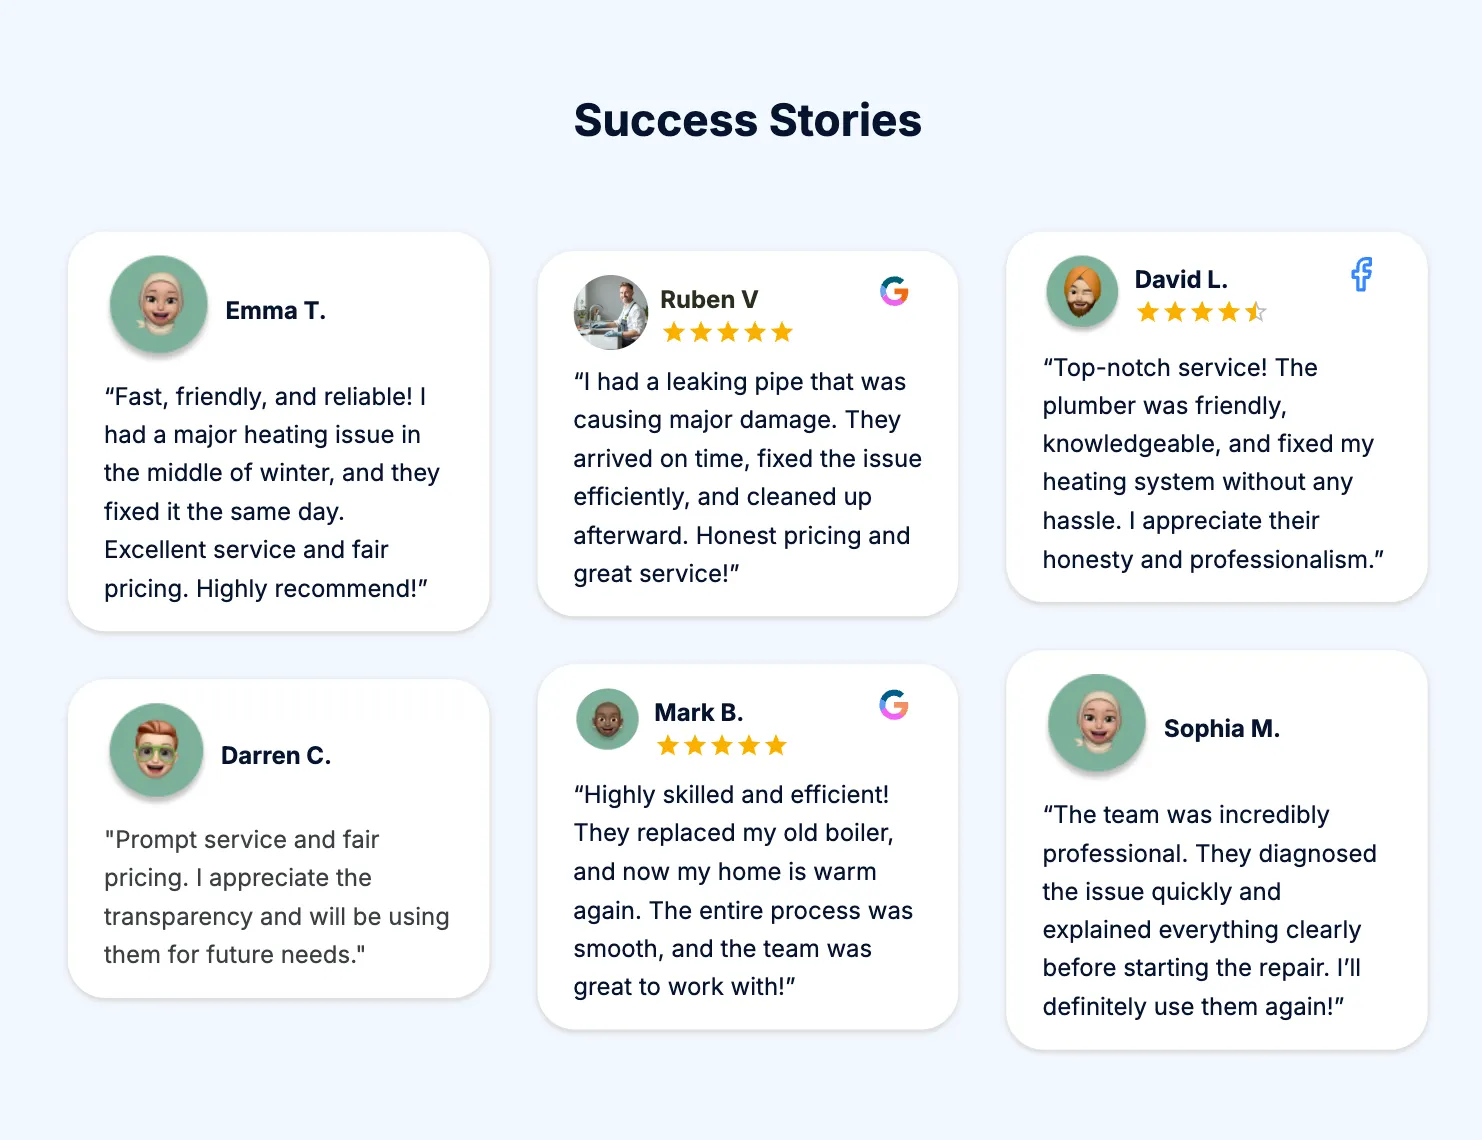
Testimonials/Reviews
While not a “page” per se, having a section that showcases customer reviews or testimonials is highly valuable. You can sprinkle these on your home page (e.g., a quote from a happy client) or have a dedicated Testimonials page. Given that 77% of customers read online reviews before hiring a plumber, and 69% are more likely to hire you after reading positive reviews , you want to show off the great feedback you’ve gotten. If you don’t have any reviews yet, ask a couple of loyal clients to write a short testimonial for your site, or use quotes from your Google Business Profile reviews (with permission). Keep them genuine – even one or two short 5-star comments like “Quick response and fixed my leak in no time – highly recommend!” add a lot of trust for new visitors. We’ll talk more about getting reviews online later, but on the site, don’t be shy to toot your horn. A dedicated reviews section can literally help convert visitors into callers .
Gallery/Projects (Optional)
Pictures speak louder than words in trades. Consider adding a gallery of photos from your jobs – before/after of a bathroom you re-piped, or a neat installation of a water heater, or simply you and your van ready for work. If you specialize (like kitchen plumbing or commercial projects), showing that work helps clients trust your capability. Ensure any photos are good quality and relevant. Even a handful of images is enough. This could be a section on the home page or its own page (“Our Work”). Some sites also incorporate short case studies or a blog, but for a beginner, these aren’t necessary. Focus on the core pages above first.
👉 Quick Writing Tips for Content: Write as if you are speaking to a customer. Keep sentences short and friendly. It’s okay to use “I” and “you” – e.g., “I offer 24-hour emergency service, so you’re never left waiting when a pipe bursts at 2 AM.” Avoid jargon; if you mention a technical term, briefly explain it (but most of the time, you can speak generally: instead of “We do hydro-jetting of sewer lines,” you might say “We clear out even the toughest clogs in your sewer lines using professional equipment.”) Also, include keywords naturally in your content. For example, mention your location (“serving homeowners in Birmingham and surrounding areas”) and your services (“plumbing repairs, water heater installation, drain cleaning in Birmingham”). This helps search engines understand what you do and where you do it – a basic local SEO must-do . But don’t go overboard – write for humans first, Google second.
👉 Quick Design Tip: As you create these pages, make sure your site’s navigation menu is easy to use. Use clear menu labels like Home, About, Services, Contact. If you have many service pages, consider a dropdown under “Services” in the menu. The easier your site is to navigate, the longer visitors will stay (and the more likely they’ll convert). One of the first tips in a leads-focused design is to ensure navigation is straightforward . No one should be puzzling over where to find your phone number or list of services.
Example: Another plumbing website’s header (Superior Plumbing). They prominently display their phone number and have a simple menu (Home, Services, About, Blog, Contact). The headline “Plumbing Repairs + Honest Answers” is catchy and builds trust. Emulate this clarity in your own content and navigation.
5. Show Trust: Add Testimonials, Photos & Credentials 👍

We touched on testimonials in the content section, but it’s worth making it a dedicated step because building trust is a make-or-break factor for turning website visitors into actual customers. Think about it – someone might find 3 plumber websites in their area; they’ll likely contact the one that feels most trustworthy and competent. Your website can silently communicate that you’re the right choice through the elements below:
• Customer Testimonials: As mentioned, include a few real quotes from happy customers. If you have reviews on your Google Business Profile, Yelp, or Facebook, you can repurpose a couple on your site (just don’t make up fake ones – people can smell those a mile away). Even better if you can include the customer’s first name and maybe a location or project (“John D. in Cardiff – leaky toilet fix”). If your website builder has a testimonials widget or slider, you can use that for a tidy look. Testimonials provide social proof – evidence that others have trusted you and got good results . Given how much consumers rely on reviews (almost as much as personal recommendations), this is powerful. One stat worth noting: 88% of consumers trust online reviews as much as personal recommendations . So showcasing positive experiences on your site is almost like having past customers vouch for you in person.
• Project Photos / Before-and-After: If you have some projects you’re proud of, show them off. For instance, snap a photo of that shiny new boiler you installed or that before-and-after of a drain clean-out. Visual proof of your work quality can reassure clients that you know what you’re doing. It doesn’t have to be a massive gallery – even 3-4 images can do the job. Make sure images are well-lit and clear. If possible, include a brief caption: “Installed new water heater for a happy customer in Leeds” or “Re-piped an old bathroom – no more leaks!” It frames the context. Actual images of you or your team at work, or your branded van, also build trust (they confirm you’re a legitimate operation and help people feel familiar with you before you even meet). In a list of top plumbing sites, having real images of the team and work was a common thread for building a human connection .
• Credentials and Awards: Do you have a plumbing license number that should be displayed? Are you a member of a professional association (like APHC in the UK or PHCC in the US)? Display those. Perhaps you have certifications (backflow prevention certified, etc.) – mention them. If you’ve gotten any local awards or recognition (even something like HomeAdvisor Top Rated or an Angi SuperService award badge), put those logos up. These little logos or mentions act as trust badges. One of the competitor insights noted that credibility-enhancing elements like badges and memberships make a site more “trustable” . Even if a customer doesn’t know what a particular certification means, seeing a row of logos on your site can subconsciously boost confidence (“oh, they’re an accredited business of some sort”). Just be honest and use the ones you truly have.
• Guarantees or Insurance: If you offer any satisfaction guarantee, warranty on your work, or you carry proper insurance/bonding – it’s good to state that on the site. A line like “Fully licensed and insured for your peace of mind” can be a deciding factor for a cautious customer. Or “All work guaranteed for 6 months” if you have such a policy. This kind of promise, if you’re prepared to back it up, sets you apart as someone who stands behind their work.
• Friendly Tone: The content of your site itself should convey approachability and professionalism, which is also a trust factor. Write in first person (“I” or “we”) and speak to the visitor (“you”) – it creates a connection. You’re not a faceless corporation; you’re Joe the Plumber who your customer could realistically have a chat with. Don’t be afraid to let a bit of personality through (maybe a touch of humor or a personal tidbit in the About page), as long as it remains professional. It shows you’re a real person.
Remember, the goal is that when someone finishes looking through your site, they feel “Yes, this person/business is legit, experienced, and I’d be safe hiring them.” Every element above contributes to that feeling.
👉 Quick Tip: Ask a friend (who isn’t a tech expert or a plumber) to look at your website once it’s nearly done. Have them tell you if there’s anything that seems “off” or if they feel any hesitation. Fresh eyes can catch things like missing info or a section that isn’t clear. Also, ensure your contact info appears on every page (usually in the footer) – many customers will just scroll to the bottom looking for a phone number or email. Don’t hide it. Make it super easy for them to reach you the moment they’re convinced.
6. Optimize for Google (Basic SEO Made Simple) 🔍
“SEO” (Search Engine Optimization) might sound technical, but at a basic level it’s something you can handle – and it’s critical if you want people to actually find your shiny new website on Google. SEO for a local service website like yours focuses on two main things: on-page optimization (what you put on your site) and local SEO (external factors like Google Business listings, which we’ll cover in the next step).

Here are beginner-friendly SEO steps to take:
• Use Relevant Keywords in Your Text: Think about what someone would search if they needed a plumber in your area. Probably things like “plumber in [Your City]” or “[Your City] [specific service].” You want those phrases (or close variations) to naturally appear on your site. We mentioned this while writing content, but ensure your homepage specifically mentions you are a “[City] plumber” or provide “plumbing services in [Area].” Also, on your services pages, use the service name in the heading (e.g., “Drain Cleaning in [City]”). These clues help Google match your site to search queries. One guide put it simply: include the types of phrases your customers might search for – services + location – in your website content . For example, “leak repair,” “emergency plumber,” “water heater installation [City].” Do not stuff them awkwardly; just weave them in where they make sense.
• Meta Titles and Descriptions: When you’re editing your site pages, most builders let you set a “SEO title” or “Page title” and a “meta description” for each page. These are what show up in Google’s search results as the headline and snippet. Craft these for each main page. For example, your Home page title could be “[Your Business Name] – Plumber in [City, State] | 24/7 Plumbing Services.” The meta description could be something like: “Trusted plumber in [City] offering reliable leak repairs, drain cleaning, water heater services and more. Licensed & insured. Call [Phone] for a free estimate.” This not only helps with SEO (by reiterating keywords/location) but also gives searchers a reason to click you. Keep meta titles around 50-60 characters if possible, and descriptions around 150-160 characters for best display.
• Ensure Mobile-Friendliness: This is huge for SEO and user experience. Google actually uses mobile-first indexing, meaning it considers how your site performs on mobile when ranking it . The good news: if you chose a modern, responsive template (Step 3), you’re likely fine. But always double-check on your phone or using the builder’s preview. Is text readable without zooming? Do images load correctly? Is the navigation easy to use on a small screen? If something looks off, adjust it. For instance, sometimes a text might be too large or an image might not scale well – your builder might allow you to hide certain elements on mobile or use different spacing. Getting this right not only pleases Google but also prevents mobile visitors from bouncing in frustration. (And as we noted, a majority of users will probably be on mobile searching for a “plumber near me” while panicking over a leak!).
• Site Speed: Beginners can’t do a ton about technical performance, but many builders take care of speed optimizations for you. Still, avoid uploading huge image files (most platforms auto-compress images or provide guidelines). Don’t overload your pages with unnecessary heavy elements. A faster site = better SEO and happier visitors. You can test your site on Google’s PageSpeed Insights tool for free; but if it’s a bit slow, usually sticking to the builder’s best practices is your best bet (for example, use their recommended image sizes, etc.).
• Internal Links: Occasionally link between your own pages. On your homepage, if you mention “Check out our full list of services,” make that a link to the Services page. Or within service pages, link “Contact us for a quote” to the Contact page. Internal links help Google crawl your site and also keep visitors navigating through it easily.
• Submit to Google (optional): Once your site is live, you can expedite its appearance on Google by using Google Search Console’s “URL Inspection” tool to request indexing of your homepage. This is a bit extra, but not too hard – you’d verify ownership of your site (your builder likely has a tutorial on connecting to Google Search Console). If you skip this, Google will still find your site eventually (especially after you set up your Google Business listing in the next step).
Overall, the key on-page SEO message is: be clear about who you are, what you do, and where you do it – both to users and to search engines. Don’t assume people know you’re in Manchester if your site doesn’t say so. Don’t assume Google will magically rank you for “emergency plumber” if you never mention that service. Spell it out, naturally and helpfully.
👉 Quick Tip: It can take a little time (days or a couple weeks) for a new site to start showing up in search results, especially if your domain is new. Don’t be discouraged. Keep searching your business name and key terms periodically to see if you appear. Meanwhile, you can share your site URL with friends or on social media to start getting a little traffic and signals that it’s active. We’re about to boost your local search presence in the next step, which will also help.
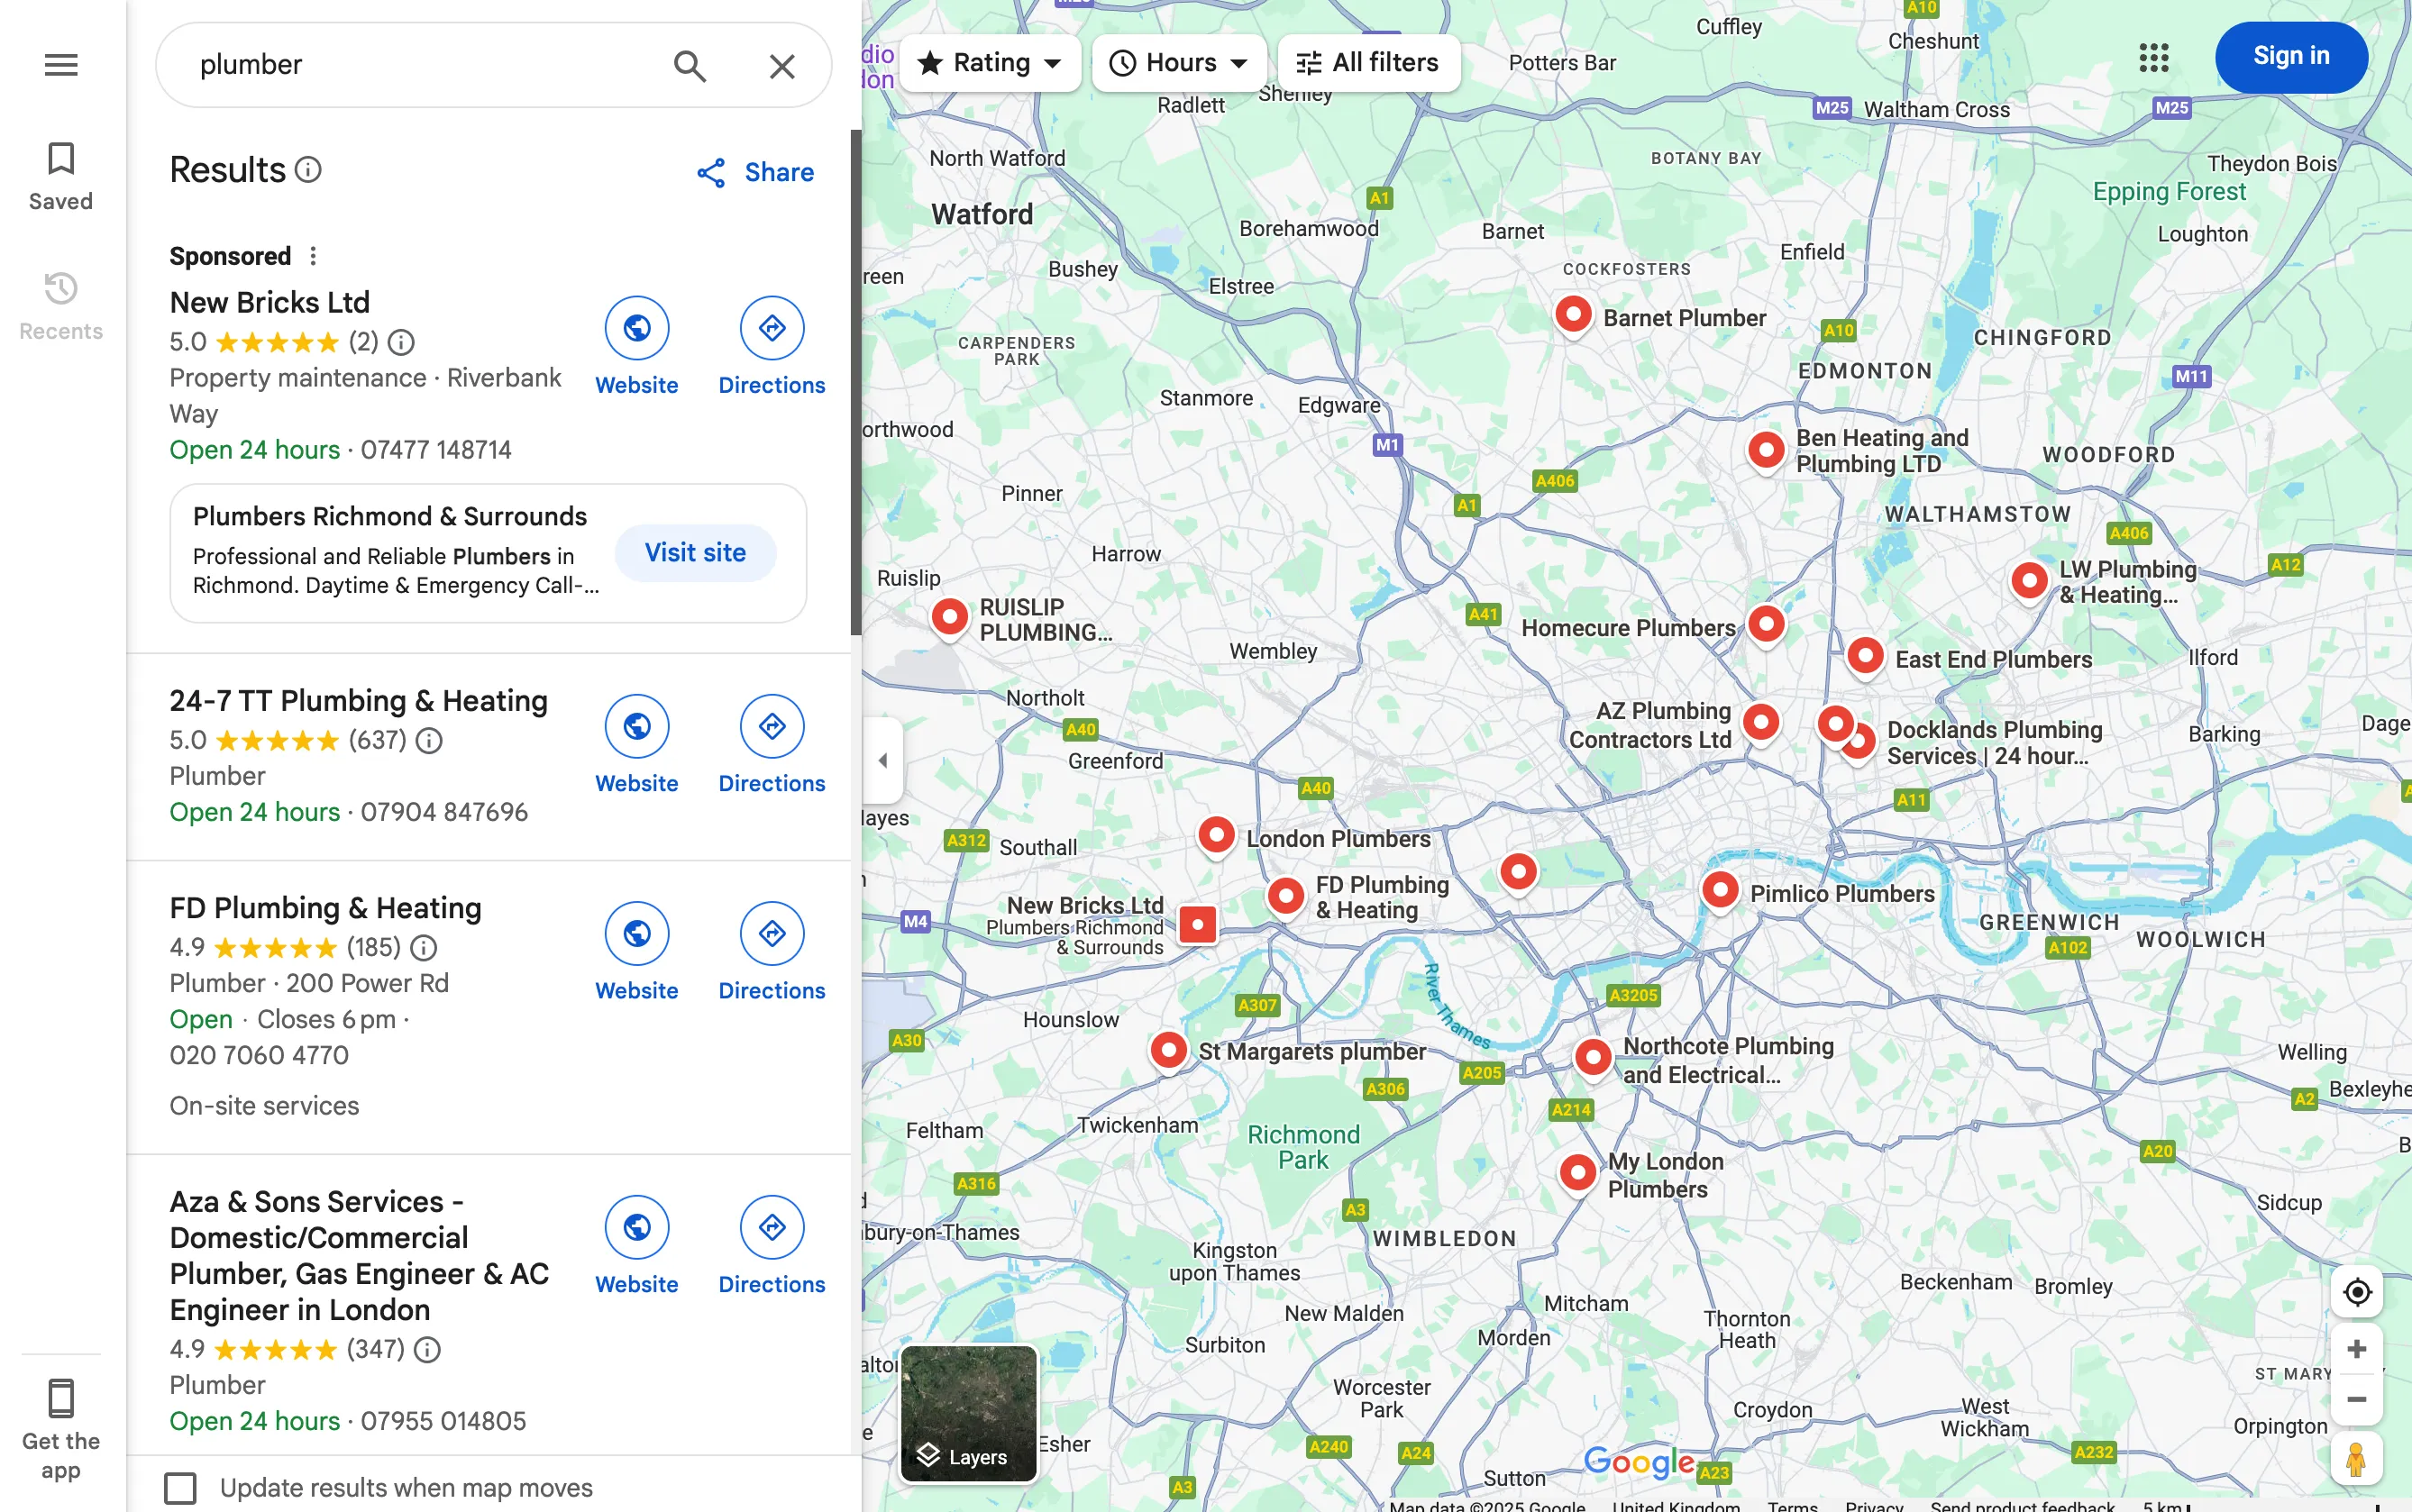
7. Claim Your Google Business Profile & Listings 📍

Creating your website is a huge step (virtual high-five, by the way, you’re doing great!). Now, to attract local customers, you’ll want to also set up your presence on Google’s business listings and other online directories. This step isn’t exactly about the website itself, but it’s something all the top guides recommend because it directly ties into your site’s success in getting leads .
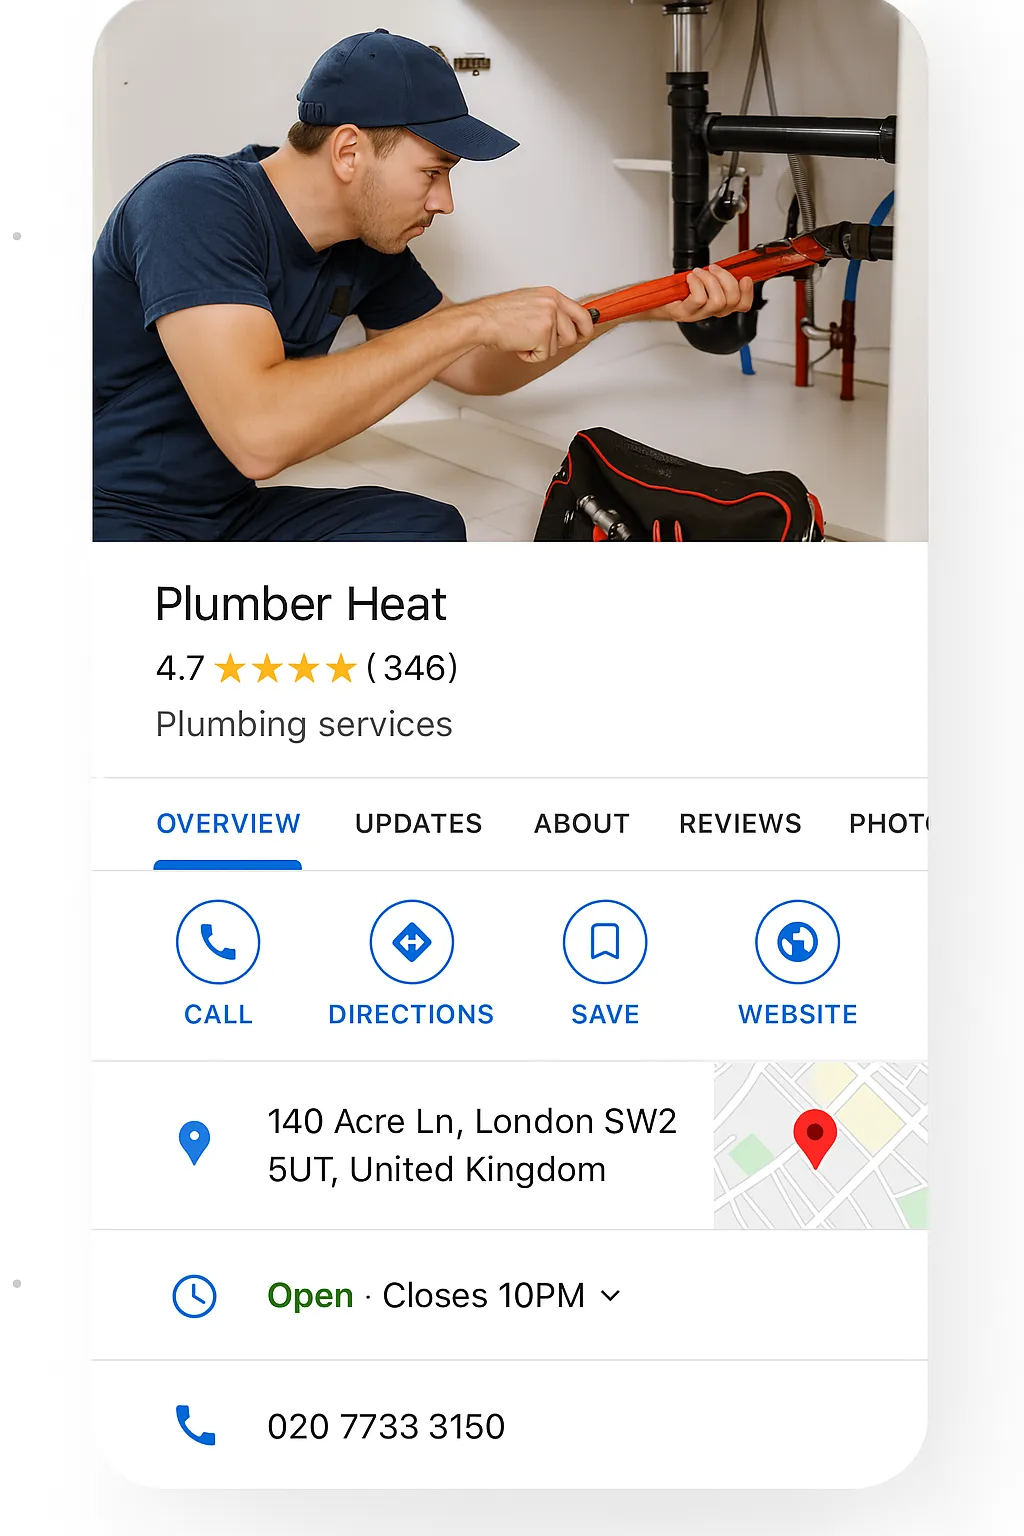
• Google Business Profile (GBP): This is the listing that appears on Google Maps and in the sidebar of search results when someone looks for your business or “[service] near me.” It’s free to create. Go to Google Business Profile (business.google.com) and follow the steps to claim or create your profile. You’ll enter your business name, address (or service area if you don’t want to list an address), phone number, website URL (yay!), hours, and services. Fill this out completely. Choose “Plumber” or related categories. Once verified (Google might call, email, or mail a postcard to ensure you’re real), your listing can show up when locals search for plumbers. This is critical – many customers go to the map and call directly from those listings. Ensure your info here matches what’s on your website (same phone number, etc.). Add a few photos too (perhaps your logo, a picture of your van or you at work). And definitely enable reviews on your GBP – this is where lots of clients will leave public reviews that future customers will read.
• Bing Places and Others: After Google, you can also copy your info to Bing Places (the Bing equivalent of Google’s business listing). It’s less used, but takes little effort and could snag a few extra leads.
• Online Directories: Consider creating profiles on Yelp, Yell (in the UK), Thomson Local, or other local trade directories. Many are free to list basic info. The goal is to get your name, address, phone (NAP) and website consistent across the web, which can indirectly help SEO and definitely help customers discover you. Be cautious with directories that charge – focus on the free ones first. A Facebook Business Page is another freebie you should create – even if you don’t use Facebook much, some people search there, and you can list your services and contact info (and link to your website).
• Link Your Website Everywhere: On all these profiles (Google, Yelp, Facebook, etc.), make sure to add your website URL. This not only drives interested people to learn more on your site, but also gives a small SEO benefit (backlinks from reputable platforms). For example, Google Business Profile allows you to put your website – definitely do that, as it’s often the way people click through to see details like pricing or more about you, straight to your site.
• Encourage Reviews: Once your Google Business Profile is live, encourage happy customers to leave a Google review for you. A strong rating and positive reviews will make your GBP (and thus your website by association) much more compelling. Many plumbing website guides highlight the importance of Google reviews – they build trust and even help your listing rank higher in map results. In fact, a BrightLocal survey found going from a 3-star to a 5-star rating can increase business significantly (and conversely, most people won’t even consider a plumber under 4 stars). While the reviews live on Google, you can showcase the best ones on your website as covered earlier, creating a nice feedback loop of trust.
👉 Quick Tip: Treat your Google Business Profile like an extension of your website. Keep it updated. If you change your phone number or hours, update both your site and your GBP. Also, use the description field in GBP to mention specialties or your USP (e.g., “Family-run plumbing service in Norwich, available 24/7 for emergencies, serving Norwich and surrounding Norfolk villages”). This can improve your visibility for those keywords.
By combining a solid website (steps 1-6) with an optimized Google Business listing and other local citations (step 7), you’re covering both bases: you have a destination for people to learn about you (your site), and you have signposts all over the internet pointing people to that destination (listings). This two-pronged approach is exactly what most top-ranking guides emphasize for generating leads online .
8. Make Sure Your Site is Mobile-Friendly 📱 (Double-Check)
We briefly covered mobile responsiveness in the SEO step, but it’s so important that it deserves its own final check. A mobile-friendly (or better, mobile-optimized) website is one that looks and works great on a smartphone. Why is this vital? Because homeowners might be discovering your site while frantically scrolling on their phone as water drips from the ceiling! If your site is hard to use on that device, they’ll bounce to a competitor.
By now, you likely chose a responsive template, but here’s a quick checklist to ensure mobile optimization:
• Fast Load on Mobile Data: Try loading your site on your phone using a normal 4G/5G connection (not just Wi-Fi). Does it load quickly (a few seconds)? Huge images or videos can slow mobile load times. If something is dragging, consider removing or replacing it. Many site builders automatically create mobile-friendly image sizes, but just be mindful if you embedded any external widgets or large media.
• Readable Text & Buttons: Is all the text large enough without pinching to zoom? Typically at least 16px font for body text is recommended on mobile. Are buttons easily clickable with a thumb? Sometimes a “Call Now” button on mobile is a lifesaver – you can make your phone number a clickable link, so mobile users just tap it to call you. Check that your contact links work on mobile (tap the phone link, does it start a call? Tap the email, does it open mail app?). If not, most builders have a simple way to format those.
• Navigation Menu: Many templates convert the menu to a “hamburger” icon (the three lines) on mobile. Click through your menu on a phone to ensure all pages are accessible and the menu isn’t broken. If a menu item has many sub-pages, see if that’s easy to expand on mobile. Simplify if needed.
• No Flash or Old Plugins: This likely won’t be an issue with modern builders, but if any content isn’t showing on mobile, it might be some incompatible element. Remove anything that doesn’t work on mobile – you can often hide certain sections on mobile view if they’re not crucial.
• Test Forms: Submit a test through your contact form on mobile to verify the form is usable and you receive the inquiry. Sometimes mobile keyboards covering fields or weird alignment can deter users from filling forms, so ensure it’s smooth.
• Overall Appearance: Does the site feel good on mobile? Images centered, background not making text illegible, etc. The site should look clean and professional on a small screen – different from desktop perhaps (stacked layout), but still coherent.
Mobile friendliness directly impacts SEO as mentioned, but also conversion. One stat: if a site is not mobile-friendly, nearly half of users will assume the business is outdated or care less about their business, according to some surveys. That might be harsh, but it’s reality – your site is an extension of your service. You wouldn’t show up to a job with broken tools; likewise, don’t “show up” on a customer’s phone with a broken website.
The good news is most website builders handle the heavy lifting here. You just need to check and fine-tune. If something’s amiss, builder support or forums can usually guide how to fix specific mobile issues.
👉 Quick Tip: Google’s Mobile-Friendly Test (just Google that term) allows you to input your URL and will tell you if there are any mobile usability problems. It’s a simple pass/fail style tool. Use it – it’s free and straight from the horse’s mouth.
9. Add Calls-to-Action (Make It Easy to Contact You) 📞
A beautiful, informative site is great – but ultimately, we want visitors to take action (call, email, fill a form). Throughout your site, you should strategically place Calls-to-Action (CTAs) that prompt the user to do something, typically “Contact us” or “Request service.” This is something some competitor articles hinted at (e.g., tradesgetonline emphasizes CTAs on every page) , and it’s crucial for conversion rate.
Here’s how to optimize your site with CTAs:


• Frequent Contact Buttons: Don’t rely on just the Contact page. Every page on your site can gently guide the visitor toward contacting you. For instance, at the end of your About Us story, have a line like “Ready to fix that leak? Get in touch with us today.” (link “Get in touch” to your contact page or phone). On your Services pages, after describing a service, add something like “Need this service? Call [Your Number] now for a free quote.” If your builder allows, use a noticeable button style for these CTAs (maybe your accent color). The idea is no matter where a visitor is on the site, a next step is presented.
• Sticky Header or Footer: Some sites have the phone number in the header that stays visible as you scroll. If your template does that, fantastic – it means the phone or “Book Now” button is always one tap away. If not, you can still ensure the top of the page has the phone in large font. On mobile, consider a fixed “Call” button at the bottom (some platforms have this option) so the user doesn’t even have to scroll back up to call.
• Keep It Simple: Each page should really have one primary CTA to avoid confusing the user. Usually for a plumber, that’s “Contact” or “Call.” Don’t complicate with multiple different CTAs (e.g., “Subscribe to newsletter” – not really relevant for our goal here). Focus on converting a visitor into a lead. “Schedule Service,” “Call Now,” “Email Us,” – any of those as per your preference, but make them obvious.
• Highlight Emergency Services: If you offer 24/7 emergency service, definitely highlight that and have an urgent CTA like “Emergency? Call 24/7 at 555-1234”. Many desperate customers will seek that out immediately. Perhaps put a small “24/7” badge or text near the phone number in the header. It can set you apart from competitors who only work 9-5.
• Contact Info in Footer: Reiterating because it’s often overlooked: put your main contact info in the footer of every page. Typically: Business Name, Phone, Email, Service Area, maybe a shortened address or based-in location. Many people scroll to bottom instinctively for contact or to see if you service their area. It’s also a good place to include any license numbers or insurance info briefly (some jurisdictions require license # on advertising, including websites).
The smoother and more obvious you make the path to contact you, the higher percentage of site visitors will actually reach out. This is the conversion optimization part of web design. It can be simple – lots of buttons and links, clearly labeled. You’d be surprised how many small biz sites hide the phone number or bury the contact link in tiny text… don’t be that site. Make yours user-friendly and action-oriented.
👉 Quick Tip: After implementing your CTAs, test them! Click your own “Call now” button on mobile to see if it dials. Submit your form to see that it says something like “Thank you, message sent” and that you receive the email. Broken contact forms or incorrect phone links can silently kill your leads – you wouldn’t know unless you test or someone tells you. So double-check these critical elements.
10. Publish & Promote Your Website 🚀
Time to go live and let the world (or at least your local community) know about your new online home! Hitting that “Publish” button on your website builder will make your site accessible at your domain. Congratulations – you now have a plumbing website! But we’re not done. A website is like a new tool; you’ve got to use it and promote it to reap the benefits. Here are final steps post-publishing:
• Do a Final Once-Over: Immediately after publishing, visit your site in an incognito/private browser window (to see it as a first-time visitor would). Click around all pages to ensure everything loads and no “under construction” filler text got left behind. It’s easy to miss a placeholder or a typo – give it one more proofread now that it’s live. Also, check it on your phone again now that it’s on your real domain. Sometimes a site can behave slightly differently when fully live vs. in preview mode (especially with custom domains).
• Announce Your Site: Leverage any existing customer base or friends to get the word out. Post on your business’s social media (or personal if you’re just starting): “🚀 We have a new website! Check it out at [YourDomain].com – let us know what you think!” This not only drives initial traffic (which Google likes to see), but you might get supportive feedback or even referrals from those who see the post. If you have an email list of clients (even a handful of past customers), you could send a quick email saying you launched a site. It’s a subtle way to remind them you’re there for any plumbing needs.
• Add Your URL Everywhere: Update your business cards, invoices, email signature, van signage – any place your business name appears – to include your website URL. “www.[YourDomain].com” on your truck or flyer helps more people find info about you at their convenience. It also signals that you’re a modern, professional operation. (If you don’t have physical marketing materials yet, make sure when you create them, the website is featured.)
• Local Networking: Mention your website when networking or talking to clients. For instance, if someone isn’t ready to commit to a service, you can say, “No worries – feel free to check out our website to see our services and reviews, and reach out through there if you have any questions.” It gives them a no-pressure way to learn more and keeps you in their mind.
• Consider a Google Ads Boost: This is optional and involves a budget, but if you want immediate visibility, you could run a small Google Ads campaign for keywords like “plumber in [Your City].” Even $5-$10 a day for a short period can put your new site at the top of search results (marked as an ad). This can jumpstart lead generation while your organic rankings are still building. If you’re not ready for ads yet, that’s perfectly fine – your Google Business listing and growing SEO will bring in traffic over time.
• Keep It Fresh (Occasional Updates): Every few months, take a moment to update your site. This could be adding a new customer testimonial, uploading a photo of a recent project, or posting a short blog article about a common plumbing tip. Regular updates signal to search engines that your site is active. Plus, if you ever have changes (new services, expanded service area, special promotions like a discount for new customers), your website is the best place to highlight that. For example, adding a note “Now offering hydro-jetting services!” or seasonal messages (“Frozen pipes? Call us for winter plumbing help”) keeps content relevant. It also gives you something to share on social media or via email to attract business during slow periods.
• Monitor Analytics: Many builders have built-in stats or you can connect Google Analytics. This is more advanced, but it’s useful to see how many people are visiting your site, which pages are popular, etc. Over time, this can inform tweaks (e.g., if a lot of people visit your “Drain Cleaning” page, maybe highlight that service more on the home page or run an ad for it). At minimum, keep an eye on how people are finding you – ask new customers if they found you online. If they frequently mention Google or “I saw your website,” you know your online presence is working!
And remember, a website is never truly “finished.” It’s a living marketing tool. The beauty is you can update it anytime – far easier than a Yellow Pages ad or print flyer. As your business grows (maybe you hire another plumber or add new services), your website grows with it.
Finally, let’s talk about the easy button one more time – the option of using Pineapple Builder to simplify a lot of what we discussed:
• If building all this still sounds like a lot of work, an AI website builder like Pineapple can create a substantial chunk of your site for you in minutes. You’d simply input key details (services, area, style preferences) and it will generate the pages with relevant text and images. You can then just edit any fine details and add your personal touches (like your own photos or specific wording). This can cut down the time significantly, essentially automating Steps 3, 4, and 6 to a large degree. Pineapple Builder is designed for busy folks like you who’d rather be fixing pipes than fixing website issues. It’s worth a try if you want a professional site without the headache – and you can always tweak the AI-generated content to make sure it sounds like you.
Ready to get online and attract more customers? Your professional, lead-generating plumbing website is within reach. You’ve got the exact roadmap to make it happen – now it’s time to turn that plan into reality.
🚀 Go for it: Take the first step and try Pineapple Builder for free to jump-start your plumbing website, or log into your chosen website platform and start building with these tips in mind. In just a short time, you can have a site that not only looks great but also brings you real business. Good luck, and happy website building!
(P.S. Remember, every hour you put into your website can pay off in many more hours saved that would have been spent finding new customers. Let your site and Google do the work of marketing for you – so you can focus on what you do best: plumbing!)
